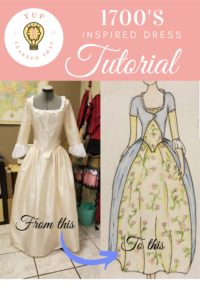
When I had the opportunity to create a revolutionary era dress for a friend’s daughter, I jumped at the chance! I love costuming and I relish the chance to learn something new, so I took to the internet to find inspiration. Pinterest had multiple ideas and we narrowed it down to the one that was the desired shape and silhouette. There were a few issues at hand though, time and money. I needed the project to not be too extensive. My friend was also budget conscious and wanted to keep costs down. I don’t blame her. Times are tough!
Materials:
To reduce the time it took to finish this project, I decided to go with a prefabricated dress from Amazon to serve as the base. The material was of good quality and was a simple enough design for me to embellish. Once I knew what the base dress looked like, I got started on a design. My friends’ daughter wanted blue as the focus in the design, so I located a blue fabric with grey undertones as the over dress at Fabric Wholesale Direct and a sheer 3D floral material on Amazon for $14.99 a yard as the accents in the shape and silhouette she requested.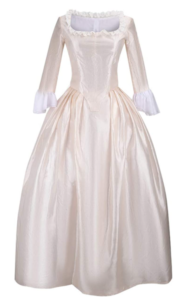

Dress Construction:
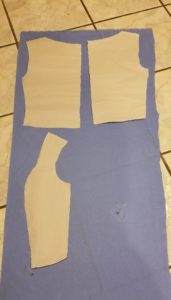
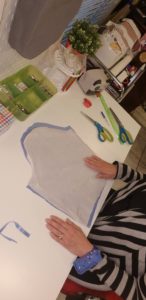
I wanted to make sure that the overall feel of the finished product was cohesive. So after fitting the base dress on the wearer, I decided to use it as my pattern for the overdress as well. I used large sheets of plain packing paper (or butcher paper) to trace separate sections of the bodice and cut them out. From there I used them to cut out my blue material.

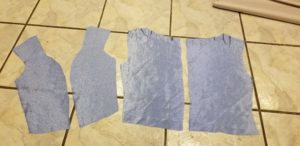
I had to remove the base sleeves and used the deconstructed sleeve as a pattern for the replacement sleeve in the blue fabric. I also ended up removing the chiffon ruffles from the base dress and reattached them to the replacement sleeve.

The center panel of the bodice and skirt was cut out in the floral fabric rather than the blue fabric. I made sure to leave enough material for the seam allowance. 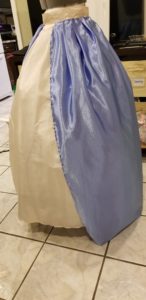 The skirt was a little tricky since I hadn’t purchased a ton of floral material due to the cost per yard. I pinned the blue over skirt to the base skirt leaving it open in the front and adding pleats along the waist. This helped to create the illusion that the floral material encompassed the entire skirt. Once I was happy with the pleats I removed the overskirt from the base skirt and sewed a straight stitch leaving an 1 inch of material along the edge. After sewing the pleats in place, I pinned the floral material to the front of the base skirt and reattached the overskirt. I cut and sewed the floral fabric to the front edge of the overskirt.
Before stitching the bodice pieces together, I decided to pin the sections in place onto the dress form to determine if any additional adjustments needed to be made. Luckily not many were needed, but It was important for me to see the overall look of the bodice before I made anything permanent.
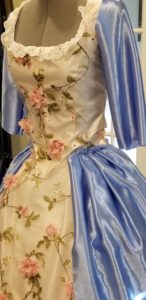


After sewing the pieces together I slipped the new blue bodice over the base and stitched them together along the center panel where the blue material and floral material meet. From there I sewed the chiffon ruffle to the new blue sleeve and attached the sleeve to the bodice. One of the challenges was to sew the back panels of the new bodice to the existing base bodice. I wanted to have the seam close enough to the edge of the existing zipper to where the base material wasn’t noticeable. Inevitably, some of the beige zipper showed through, but luckily it wasn’t too noticeable.
Design Changes:
As a last minute design and functionality choice, I had to make adjustments to the functional design of the base skirt and the overall look of the bodice. The trickier of the two, was the reworking of the closure for the base skirt.
Skirt Dilemma:
I hadn’t paid attention that the closure was on the side rather than the back. My plan was to sew the blue fabric directly to the waistband of the base skirt to maintain the volume in the hips, which was common in this style of dress and already part of the base skirt. Having the closure on the side made a few things more difficult. I wasn’t able to sew the “Overskirt directly to the base skirt in that section.
Issues to consider:
- If I turned the closure to the back, the overall dress would lose the characteristic fullness in the hips; creating a very strange silhouette.
- If I keep the closure on the side and sew the blue fabric along the waistline as I had intended to, the wearer would not be able to put on or take off the skirt.
I had to step away from the problem for a while to get over my frustration and gain fresh perspective. I adjusted my plan by keeping the closure of the base skirt on the side. Then sewing the overskirt along the waistline as I had originally intended to, but I would stop at the back side of the closure. This left roughly five inches of material detached from the base skirt. That way the wearer can button and unbutton the side closure as needed. To attach the rest of the overskirt to the base skirt I added a snap to secure the material. To finish the dress I hemmed the overskirt so I would be slightly longer than the base skirt.
Bodice Dilemma:
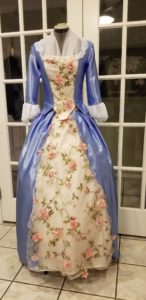
 The easier dilemma to solve was the overall look of the bodice. The wearer has a long torso and I didn’t want to risk the bodice being too shore for her and exposing the waistline of the skirt as she moved around. I decided to add trim along the bottom of the bodice to give a coat-like appearance to the dress. Since the wearer has a long torso and I also wanted to give her additional coverage to hide the beige color of the waistband. After playing with the design several times, from pleated or not pleated, I ultimately decided on a clean less bulky look with no pleats. To complete the overall look I added a chiffon scarf around the neckline and bust and created a floral headpiece using hot glue, scrap blue fabric, and 5 of the 3-D flowers.
Ta-Da! 1700’s revolutionary dress upcycling complete!
When someone writes an paragraph he/she keeps the plan of a user in his/her brain that how
a user can know it. Thus that’s why this article is perfect.
Thanks!
Thank you you! I want to continue to share my though processes on different projects I create.
Wow! This blog looks exactly like my old one! It’s on a entirely different subject but it has pretty much the
same page layout and design. Superb choice of colors!
Thank you!
Hello there! This is kind of off topic but I need some help from
an established blog. Is it difficult to set up your own blog?
I’m not very techincal but I can figure things out pretty fast.
I’m thinking about setting up my own but I’m not sure where to begin. Do you have any tips or suggestions?
Appreciate it
Check out my web blog … area 52
I spent some time learning how to set up a website/blog using YouTube tutorial videos. It wasn’t too difficult, especially when I learned that you can use a template to start of with. I still have plenty to learn and managing that with a full time job and 2 kids is a challenge.